Sub GetSpaceInDrives()
'Dim oDinfo As DriveInfo
Dim oDrvs() As DriveInfo = DriveInfo.GetDrives
For Each Drv In oDrvs
If Drv.IsReady Then
MsgBox(Drv.Name & " " & Drv.AvailableFreeSpace.ToString)
End If
Next
End Sub
The statement
Dim oDrvs() As DriveInfo = DriveInfo.GetDrives
retrieves the drive names of all logical drives on a computer.
The IsReady property returns true if the drive is ready; false if the drive is not ready. If this check is not done then you will get System.IO.IOException was unhandled Message="The device is not ready. " exception.
AvailableFreeSpace property indicates the amount of free space available on the drive. Note that this number may be different from the TotalFreeSpace number because this property takes into account disk quotas
Tuesday, January 6, 2009
Open & Close Notepad using .Net
Opening & Closing of Application using .Net / Create New process in .Net / Shell Function in .Net
A program is not Userinterface and database connections alone, it also needs to interact with other applications. Many a times, this interaction happens internally, like updating Word Template, Printing out a document etc, but there are times where one needs to open an document through the Application.
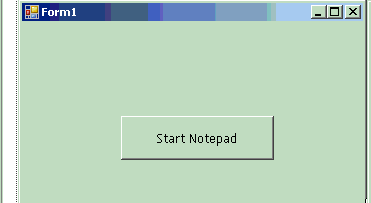
Let us have a sample app that opens a Notepad on click of a command button. We have a sample form with a button (see below).
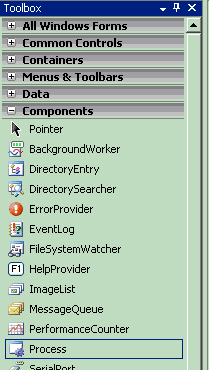
Now add the process control from the Components Control (see below)
This control has no design features and will be used in run-time and it straightway gets docked in the tray (see below)

Change the following properties of the control.
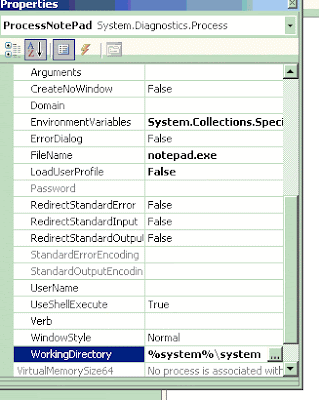
This can also be changed during run time.
Now in the Button Click event write the following code:
Private Sub ButtonNotepad_Click(ByVal sender As System.Object, ByVal e As System.EventArgs) Handles loadNotepadButton.Click
' http://dotnetdud.blogspot.com/
ProcessNotepad.EnableRaisingEvents = True
ProcessNotepad.Start()
End Sub
The EnableRaisingEvents property indicates whether the component should be notified when the operating system has shut down a process. The EnableRaisingEvents property is used in asynchronous processing to notify your application that a process has exited. To force your application to synchronously wait for an exit event (which interrupts processing of the application until the exit event has occurred), use the WaitForExit method.
This will start the Notepad Application. If you want receive the closure of application use the following event
Private Sub ProcessNotepad_Exited(ByVal sender As System.Object, ByVal e As System.EventArgs) Handles ProcessNotepad.Exited
' Coded for http://dotnetdud.blogspot.com/
MessageBox.Show("Notepad has been closed ", "Dot Net Tips & Tricks", MessageBoxButtons.OK)
End Sub
If you want to close the application use the kill method.
Private Sub ButtonClose_Click(ByVal sender As System.Object, ByVal e As System.EventArgs) Handles closeNotepadButton.Click
If ProcessNotepad.HasExited = False Then
ProcessNotepad.Kill()
End If
End Sub
A program is not Userinterface and database connections alone, it also needs to interact with other applications. Many a times, this interaction happens internally, like updating Word Template, Printing out a document etc, but there are times where one needs to open an document through the Application.
Let us have a sample app that opens a Notepad on click of a command button. We have a sample form with a button (see below).

Now add the process control from the Components Control (see below)

This control has no design features and will be used in run-time and it straightway gets docked in the tray (see below)

Change the following properties of the control.

This can also be changed during run time.
Now in the Button Click event write the following code:
Private Sub ButtonNotepad_Click(ByVal sender As System.Object, ByVal e As System.EventArgs) Handles loadNotepadButton.Click
' http://dotnetdud.blogspot.com/
ProcessNotepad.EnableRaisingEvents = True
ProcessNotepad.Start()
End Sub
The EnableRaisingEvents property indicates whether the component should be notified when the operating system has shut down a process. The EnableRaisingEvents property is used in asynchronous processing to notify your application that a process has exited. To force your application to synchronously wait for an exit event (which interrupts processing of the application until the exit event has occurred), use the WaitForExit method.
This will start the Notepad Application. If you want receive the closure of application use the following event
Private Sub ProcessNotepad_Exited(ByVal sender As System.Object, ByVal e As System.EventArgs) Handles ProcessNotepad.Exited
' Coded for http://dotnetdud.blogspot.com/
MessageBox.Show("Notepad has been closed ", "Dot Net Tips & Tricks", MessageBoxButtons.OK)
End Sub
If you want to close the application use the kill method.
Private Sub ButtonClose_Click(ByVal sender As System.Object, ByVal e As System.EventArgs) Handles closeNotepadButton.Click
If ProcessNotepad.HasExited = False Then
ProcessNotepad.Kill()
End If
End Sub
Monday, January 5, 2009
Abstract Methods in C# .NET
An abstract method is a virtual method with no implementation. The actual implementation of the abstract method will be from a overridden method of the derived class.
An abstract method is declared with the abstract modifier and is permitted only in a class that is also declared abstract.
public abstract class AbsExample {
public abstract string AbsMethod();
}
An abstract method must be overridden in every non-abstract derived class.
class AbsImplementor : AbsExample
{
public override string AbsMethod()
{
//code here...
return "AbsMethod Implemented!!!";
}
}
The method can be invoked by...
AbsImplementor a1 = new AbsImplementor();
Get All Files from a Folder in C#.Net
The following code lists all the files from the specifed folder and its sub folders
To list all Excel files using C#, modify the first argument to “*.xls”
private static void GetFilesFromDirectory(string DirPath)
{
try
{
DirectoryInfo Dir = new DirectoryInfo(DirPath);
FileInfo[] FileList = Dir.GetFiles("*.*", SearchOption.AllDirectories );
foreach (FileInfo FI in FileList )
{
Console.WriteLine(FI.FullName);
}
}
catch (Exception ex)
{
Console.WriteLine(ex.Message );
}
}
The following wildcard specifiers are permitted in searchPattern.
Wildcard character | Description |
* | Zero or more characters. |
? | Exactly one character. |
Search for Word files starting with “Proposal” using C# in Current Directory
FileInfo[] FileList = Dir.GetFiles("Employee*.xls", SearchOption.TopDirectoryOnly );
Export GridView and Save into web Server
public void Export(string fileName, GridView gv)
{
HttpContext.Current.Response.Clear();
using (StringWriter sw = new StringWriter())
{
using (HtmlTextWriter htw = new HtmlTextWriter(sw))
{
// Create a form to contain the grid
Table table = new Table();
// add the header row to the table
if (gv.HeaderRow != null)
{
this.PrepareControlForExport(gv.HeaderRow);
table.Rows.Add(gv.HeaderRow);
}
//gv.DataBind();
// add each of the data rows to the table
foreach (GridViewRow row in gv.Rows)
{
this.PrepareControlForExport(row);
table.Rows.Add(row);
}
// add the footer row to the table
if (gv.FooterRow != null)
{
this.PrepareControlForExport(gv.FooterRow);
table.Rows.Add(gv.FooterRow);
}
// render the table into the htmlwriter
table.RenderControl(htw);
Stream fsExportFile = new FileStream(Server.MapPath("~/Upload/EdvImage/") + _exlFile, FileMode.OpenOrCreate, FileAccess.Write, FileShare.None);
System.IO.MemoryStream memStr;
System.Text.ASCIIEncoding myEncoder = new System.Text.ASCIIEncoding();
byte[] bytes = myEncoder.GetBytes(htw.InnerWriter.ToString());
memStr = new MemoryStream(bytes);
memStr.WriteTo(fsExportFile);
fsExportFile.Close();
}
}
}
{
HttpContext.Current.Response.Clear();
using (StringWriter sw = new StringWriter())
{
using (HtmlTextWriter htw = new HtmlTextWriter(sw))
{
// Create a form to contain the grid
Table table = new Table();
// add the header row to the table
if (gv.HeaderRow != null)
{
this.PrepareControlForExport(gv.HeaderRow);
table.Rows.Add(gv.HeaderRow);
}
//gv.DataBind();
// add each of the data rows to the table
foreach (GridViewRow row in gv.Rows)
{
this.PrepareControlForExport(row);
table.Rows.Add(row);
}
// add the footer row to the table
if (gv.FooterRow != null)
{
this.PrepareControlForExport(gv.FooterRow);
table.Rows.Add(gv.FooterRow);
}
// render the table into the htmlwriter
table.RenderControl(htw);
Stream fsExportFile = new FileStream(Server.MapPath("~/Upload/EdvImage/") + _exlFile, FileMode.OpenOrCreate, FileAccess.Write, FileShare.None);
System.IO.MemoryStream memStr;
System.Text.ASCIIEncoding myEncoder = new System.Text.ASCIIEncoding();
byte[] bytes = myEncoder.GetBytes(htw.InnerWriter.ToString());
memStr = new MemoryStream(bytes);
memStr.WriteTo(fsExportFile);
fsExportFile.Close();
}
}
}
Export ListView To Excel
Public Function ExportListViewToExcel(ByVal MyListView As Windows.Forms.ListView)
2:
3:    '=========================================================================
4:    '== This is our Exvel Class ==
5:    '== Remember to add a refrence to Microsoft Excel XX.XX Object Libary ==
6:    '=========================================================================
7:    Dim ExcelReport As Excel.ApplicationClass
8:
9:    '=========================================================================================
10:    '== TMAX_COLOURS is the masimum amount of colours excel will let us save in the palet ==
11:    '=========================================================================================
12:    Const MAX_COLOURS As Int16 = 40
13:
14:    '=======================================================================
15:    '== Excel will only allow 25 colums per sheet (starting at 0 = 254) ==
16:    '=======================================================================
17:    Const MAX_COLUMS As Int16 = 254
18:
19:    '=====================================================
20:    '== Simple counter to count itesm in our listview ==
21:    '=====================================================
22:    Dim i As Integer
23:    Dim New_Item As Windows.Forms.ListViewItem
24:
25:    '==========================================================
26:    '== The Colum Letter(and number) we are on and the row ==
27:    '==========================================================
28:    Dim TempColum As Int16
29:    Dim ColumLetter As String
30:    Dim TempRow As Int16
31:    Dim TempColum2 As Int16
32:
33:    '=============================================
34:    '== Colours we have added to Excels palet ==
35:    '=============================================
36:    Dim AddedColours As Int16 = 1
37:    Dim MyColours As Hashtable = New Hashtable
38:
39:    '===========================================================================
40:    '== Variables to control if we need to add a new colour to Excels palet ==
41:    '===========================================================================
42:    Dim AddNewBackColour As Boolean = True
43:    Dim AddNewFrontColour As Boolean = True
44:    Dim BackColour As String
45:    Dim FrontColour As String
46:
47:    '============================================================
48:    '== Setup our Excel Class and open a new workbook to use ==
49:    '============================================================
50:    ExcelReport = New Excel.ApplicationClass
51:
52:    '-- Setting this to false and then resetting it to true at the end will stop
53:    '-- a user clicking around in excel and causing a possible error
54:    ExcelReport.Visible = True
55:
56:    ExcelReport.Workbooks.Add()
57:    ExcelReport.Worksheets("Sheet1").Select()
58:    ExcelReport.Sheets("Sheet1").Name = MyListView.Name
59:
60:    '=======================================================
61:    '== Add all the colums from the listview into Excel ==
62:    '=======================================================
63:    i = 0
64:    Do Until i = MyListView.Columns.Count
65:
66:     '==========================================================================
67:     '== Work out which colum we are on ==
68:     '== The Colums Go from A-Z and to IV, so A-Z to AA-AZ to BA-BZ etc etc ==
69:     '==========================================================================
70:     If i > MAX_COLUMS Then
71:
72:      MsgBox("Too many Colums added")
73:      Exit Do
74:
75:     End If
76:     TempColum = i
77:     TempColum2 = 0
78:     Do While TempColum > 25
79:
80:      TempColum -= 26
81:      TempColum2 += 1
82:
83:     Loop
84:
85:     ColumLetter = Chr(97 + TempColum)
86:     If TempColum2 > 0 Then ColumLetter = Chr(96 + TempColum2) & ColumLetter
87:
88:     '=======================================================
89:     '== Add all the colums from the listview into Excel ==
90:     '=======================================================
91:     ExcelReport.Range(ColumLetter & 1).Value = MyListView.Columns(i).Text
92:     ExcelReport.Range(ColumLetter & 1).Font.Name = MyListView.Font.Name
93:     ExcelReport.Range(ColumLetter & 1).Font.Size = MyListView.Font.Size
94:     i += 1
95:
96:    Loop
97:
98:    '==================================================================================
99:    '== Move to the second row in Excel and get all the items out of the list view ==
100:    '==================================================================================
101:    TempRow = 2
102:    For Each New_Item In MyListView.Items
103:
104:     i = 0
105:     Do Until i = New_Item.SubItems.Count
106:
107:      '==========================================================================
108:      '== Work out which colum we are on ==
109:      '== The Colums Go from A-Z and to IV, so A-Z to AA-AZ to BA-BZ etc etc ==
110:      '==========================================================================
111:      If i > MAX_COLUMS Then
112:
113:       MsgBox("Too many Colums added")
114:       Exit Do
115:
116:      End If
117:
118:      TempColum = i
119:      TempColum2 = 0
120:
121:      Do While TempColum > 25
122:
123:       TempColum -= 26
124:       TempColum2 += 1
125:
126:      Loop
127:
128:      ColumLetter = Chr(97 + TempColum)
129:      If TempColum2 > 0 Then ColumLetter = Chr(96 + TempColum2) & ColumLetter
130:
131:      '===========================================================================
132:      '== Add all the List View colums into Excel ==
133:      '== We also get the List Views font type and size and set it to the row ==
134:      '===========================================================================
135:      ExcelReport.Range(ColumLetter & TempRow).Value = New_Item.SubItems(i).Text
136:      ExcelReport.Range(ColumLetter & TempRow).Font.Name = New_Item.Font.Name
137:      ExcelReport.Range(ColumLetter & TempRow).Font.Size = New_Item.Font.Size
138:
139:      '============================================================
140:      '== Reset the check to see if we have found a new colour ==
141:      '============================================================
142:      AddNewFrontColour = False
143:      AddNewBackColour = False
144:      Try
145:
146:       '===================================================================
147:       '== Check our Colours Hashtable for a colour with the same name ==
148:       '== as the backcolour of our listview item ==
149:       '===================================================================
150:       BackColour = MyColours(New_Item.BackColor.ToString)
151:       If BackColour = "" Then AddNewBackColour = True
152:
153:       '===================================================================
154:       '== Check our Colours Hashtable for a colour with the same name ==
155:       '== as the Text colour of our listview item ==
156:       '===================================================================
157:       FrontColour = MyColours(New_Item.ForeColor.ToString)
158:       If FrontColour = "" Then AddNewFrontColour = True
159:
160:      Catch ex As Exception
161:
162:       AddNewFrontColour = False
163:       AddNewBackColour = False
164:
165:      End Try
166:
167:      '=========================================================================
168:      '== If there is room for new colours and we have found some, add them ==
169:      '== to Excels palet ==
170:      '=========================================================================
171:      If AddedColours <> -1) Then
172:
173:       If AddNewBackColour Then
174:
175:        MyColours.Add(New_Item.BackColor.ToString, AddedColours)
176:        ExcelReport.Workbooks.Item(1).Colors(AddedColours) = RGB(New_Item.BackColor.R, New_Item.BackColor.G, New_Item.BackColor.B)
177:        AddedColours += 1
178:
179:       End If
180:
181:       If AddNewFrontColour Then
182:
183:        MyColours.Add(New_Item.ForeColor.ToString, AddedColours)
184:        ExcelReport.Workbooks.Item(1).Colors(AddedColours) = RGB(New_Item.ForeColor.R, New_Item.ForeColor.G, New_Item.ForeColor.B)
185:        AddedColours += 1
186:
187:       End If
188:
189:      End If
190:
191:      '========================================================================
192:      '== Now all we need to do it select the rown and set the two colours ==
193:      '== Interior is back backgrounf and Font is the font colour ==
194:      '========================================================================
195:      ExcelReport.Rows(TempRow & ":" & TempRow).select()
196:      ExcelReport.Selection.Interior.ColorIndex = MyColours(New_Item.BackColor.ToString)
197:      ExcelReport.Selection.Font.ColorIndex = MyColours(New_Item.ForeColor.ToString)
198:
199:      i += 1
200:
201:     Loop
202:     TempRow += 1
203:
204:    Next
205:
206:    '=======================================================================
207:    '== Now all thats left to do is select all the colums and rows ==
208:    '== Resize them to so they are all the right widths to see the data ==
209:    '== and finaly select from A1 so the user is taken to the start ==
210:    '=======================================================================
211:    ExcelReport.Cells.Select()
212:    ExcelReport.Cells.EntireColumn.AutoFit()
213:    ExcelReport.Cells.Range("A1").Select()
214:
215:   End Function
216:
/code]
Subscribe to:
Posts (Atom)